
Background blurring—also known as “bokeh”—is a photographic and visual technique that involves producing a soft, out-of-focus background while maintaining sharp focus on the subject. It reduces distractions, adds depth, and improves the image’s overall appeal. Background blurring is a powerful technique that can be used for shooting videos, taking portraits, or capturing products. If you use Adobe Lightroom, you should be familiar with how to blur the background.
Is there any tool for background blurring in Lightroom?
While Lightroom is not the only photo editor that offers a one-click direct background blur option, Adobe Lightroom does not have a direct tool for the same purpose. Nevertheless, you can still achieve a very accurate background blur using a few basic techniques. I will walk you through using the brush tool, masking, and adjustment brushes, among other methods, in Lightroom Classic, Lightroom Desktop, and Lightroom Mobile. I will make this process simple and straightforward for you, so let us get started.
How to Blur Background in Adobe Lightroom?
Step1: Import your photo
- Open Adobe Lightroom on your computer.
- Connect your camera or memory card to your computer using the appropriate cable or card reader.
- Optionally, create a new catalog or use an existing one to organize your photos.
- In the Library module, click the “Import” button at the bottom left of the screen or go to “File > Import Photos and Video.”
Step2: Selecting the subject
There are several methods for choosing which area to blur, but let us talk about a few of the more straightforward ones.
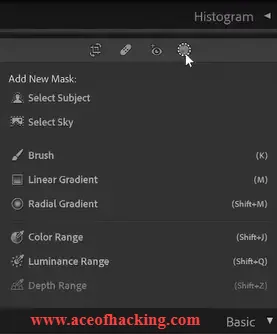
Method 1: Select Subject Tool
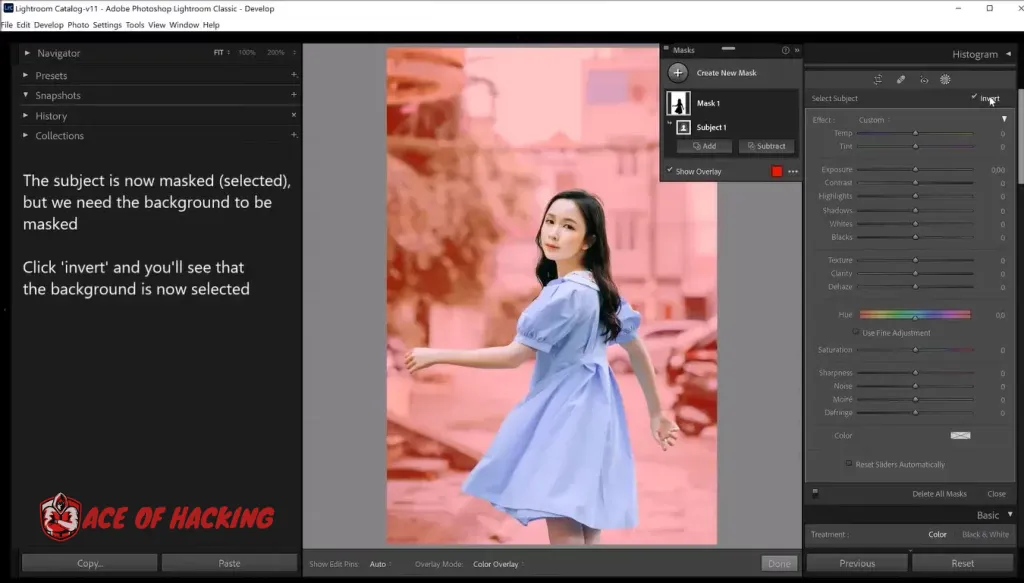
The Select Subject tool is located in the Develop module of Lightroom Classic. Make sure you are using the most recent version of Lightroom Classic, as there have been updates. Adobe Lightroom will automatically select the subject in the photo and highlight it; if it isn’t, make sure to check the showing overlay option.

Now that we require background selection, not the subject. Therefore, you have to go to the three dots option next to the subject selection tool and just click the “invert. It will automatically shift the selection to the background, leaving the subject intact.
Method 2: Brush Tool
Once more, you can choose different brushes in Lightroom’s Develop module based on the kind of tip you feel most comfortable using. The next step is to choose the background, so customize the brush. I believe you already know that the drill should use a larger size in the periphery and a smaller size around the subject to avoid making any mistakes. If you do make a mistake and accidentally select any part of the subject, you can simply select the eraser tool and erase the area. The painted area will show red; if it doesn’t, check the show overlay option.
Method 3: Radial Filter
Only use this technique on spherical or oval subjects.
- Find the Radial Filter tool in the Develop module. It is typically located in the toolbar on the right side of the screen and is denoted by an icon that resembles an ellipse or circle.
- To locate the center of the radial filter, click on the image; to construct an ellipse or circular shape around the topic or area you wish to choose, click, hold, and drag the image.
- Once the filter has been created, you can move the entire filter by clicking and dragging the center point, as well as change the filter’s size, shape, and orientation by clicking and dragging the control points on the filter.
- If necessary, adjust the feather slider to adjust the transition between the area that is selected and the surrounding area. A smoother transition is produced by a greater feather value.
Method 4: Gradient filter
The gradient filter is used to create a more natural blur, with the subject and surrounding areas remaining clear and distant parts muted, by gradually blending the image from the center to the periphery.
Find the Linear Gradient Filter tool in the Develop module. It is typically located in the toolbar on the right side of the screen and has an icon that resembles a rectangle with a solid line extending from it.
- Click on the image where you want to start the linear gradient and drag your pointer to where you want the gradient to end. This will produce a linear gradient that spans the selected area.
- Once the gradient has been created, you can play around with its position and angle by clicking and dragging the line’s endpoints; you can also play around with the gradient’s width and feathering by dragging the point in the middle.
- Adjust exposure, contrast, saturation, and other editing factors to achieve the desired effect within the linear gradient region. The adjustments section for the linear gradient filter is located in the right-hand panel.
Step 3: Applying the blur effect
Additionally, there are two methods to apply blur: either individually or in combination, based on the degree of blur you desire in your background. To begin with, you can slide down the clarity slider; in other words, if you slide the clarity slider to the left, less clarity will be present, which will ultimately aid in blurring the background. Similarly, if you slide the sharpness slider to the left, less sharpness will be present, which will also ultimately aid in blurring the background.
Step 4: Refining and Final Touches
If you see some blurring in your background, you can adjust it in Adobe Lightroom. You can use various tools, including brushes and erasers, to adjust your shot until it reaches the level of perfection you desire.
Step 5: Exporting your masterpiece
- Select the photo you want to export in the Library or Develop module.
- Go to the “File” menu.
- Choose “Export” from the drop-down menu.
- In the Export dialog that opens:
- Select the export location and choose a folder to save your photo.
- Set the file format (e.g., JPEG, TIFF, etc.).
- Adjust the quality and resolution settings if needed.
- Choose the color space (sRGB is standard for the web and most displays).
- Specify the file naming and renaming options if desired.
- Apply any sharpening or watermarking settings.
- Click the “Export” button to save the photo with the specified settings to the chosen folder.
Tips and Tricks:
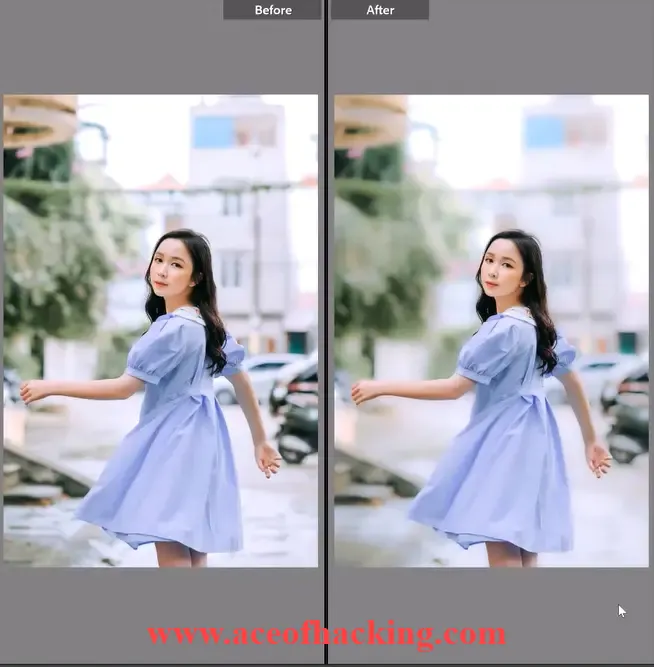
To emphasize the effect of your modifications, include side-by-side comparisons of your photo taken before and after you applied background blur.
Reducing the haze in your background with the Dehaze tool can help make the subject and background more distinct from one another.
Save your settings as a custom preset if you often apply similar blur effects. This will help you to assure consistency in your edits and save time down the road.
Bonus Tip: Depth of field (DoF) is the area in your photo that appears sharp and in focus. When you use a low aperture value (wide aperture), the DoF becomes shallow, meaning only a small portion of the scene is sharp, while the rest, including the background, is blurred. Use a lens with a wide aperture (e.g., f/1.8, f/2.8). The aperture setting controls the size of the lens opening, which directly impacts the depth of field.
How to blur the background in Lightroom Mobile?
- Import or Capture: Start by importing your image into Lightroom or take a new one using Lightroom’s camera.
- Activate Selective Mode: Go to the menu and select Selective Mode to enable it.
- Open Selective Tools: Tap the Plus icon on the left to access selective tools.
- Choose a method: Pick a radial filter, graduated filter, or brush, depending on your preference.
- Create a Selection Mask: Tap and drag on the image to create a selection mask over the area you want to blur.
- Mask Options: If needed, tap and hold on the pin to access options like Invert, Duplicate, or Delete for the mask.
- Adjust Detail: Scroll through the menu and find Detail, then open the sliders.
- Blur the Background: Drag the Sharpening slider to the left to blur the background.
- Save or Share: Once you’re satisfied with the changes you have made, save or share your final image.
FAQs: How to Blur Background in Adobe Lightroom
What is the benefit of blurring the background in my photos?
Known as “bokeh,” blurring the background can enhance your subject, take away distractions, and give your photos a beautiful look.
Do I need a specific type of lens to achieve background blur in Lightroom?
Unfortunately, Lightroom does not come with a shallow depth of field simulation tool. However, you can still use Lightroom to generate background blur even without a specialized lens.
Can I blur the background in Lightroom Mobile?
Yes, Lightroom Mobile gives you the ability to edit and blur the background of your photographs right on your phone.
Is there a recommended Lightroom setting for blurring the background?
Common methods for achieving background blur include using a wide aperture (f/1.8, for example), selective masking, and tweaking sliders for sharpness and clarity.
Is it possible to blur the background in Lightroom and yet get rid of background distractions?
Yes, you can improve the overall appearance of your image and remove distracting background elements with Lightroom’s masking and editing tools.
Is Lightroom capable of producing unique bokeh shapes?
While there are many blur effects available in Lightroom, the process of producing unique bokeh shapes is often carried out in-camera with specialist lenses or filters.
Is it possible to remove the backdrop from a smartphone photo?
Yes, you may use Lightroom to blur the backdrop in smartphone shots to improve the overall aesthetic of your mobile images.
Conclusion: How to Blur Background in Adobe Lightroom
To sum up, learning how to blur a background in Adobe Lightroom gives your photos a polished appearance that is both visually appealing and aesthetically pleasing. By following the detailed instructions in this blog post, you have learned a lot about the tools and techniques Lightroom offers to help you achieve a beautiful blurred background.
Photographers and enthusiasts can control focus, highlight subjects, and improve overall composition by learning how to blur the background in Adobe Lightroom. Whether you are taking product shots, portraits, or any other kind of photography, the visual impact of your work can be greatly increased by mastering the technique of creating a smooth and creamy background blur.
Lightroom has many tools available for achieving background blur, so try different approaches until you find one that works best for your style and subject matter. Experimentation is the key to making these techniques unique in your editing workflow.
The path to mastering background blur is never-ending; every new project offers chances to hone your skills and create compelling, professionally edited images. Explore the creative potential of Adobe Lightroom and witness your images come to life with breathtaking background blur effects! Stay tuned for more insightful tips and tutorials to improve your Adobe Lightroom skills!