The best Adobe Lightroom export settings for social media, Instagram, print, the web, and many other platforms will be covered. We will also talk about file naming, file settings, image format, quality, and color space, image sizing, metadata settings, watermarking, and more—all while maintaining high resolution and preserving quality.
Lightroom Export Settings For Instagram
- Location: Choose your preferred destination.
- File Naming: Use “Filename_Instagram” for clarity.
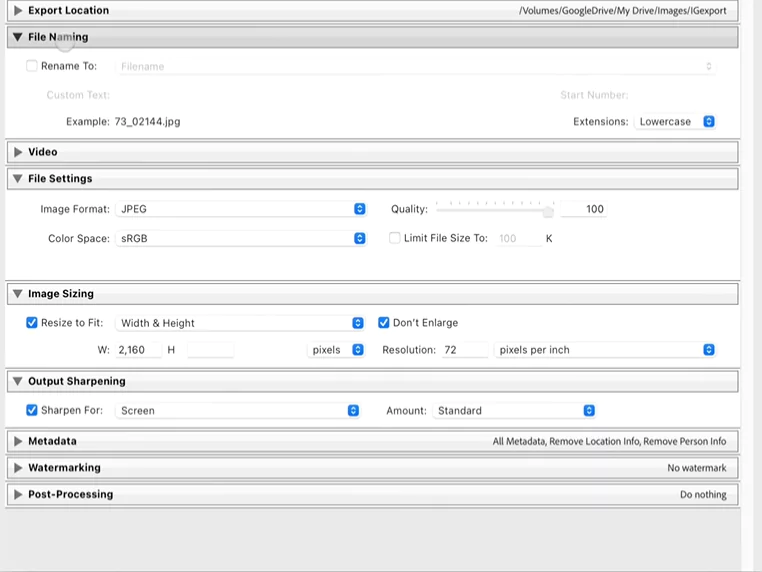
- File Settings: Select JPEG format, sRGB color space, and set quality to 85%.
- Image Sizing: Width at 2160px and resolution at 72 PPI.
- Sharpening: Opt for screen sharpening with standard settings.
- Metadata: Keep the default setting.
- Watermarking: Customize according to your preference.
Tip: Instagram displays 1080p for width dimensions, but I have found that if I keep the width at 2160p and leave the height box empty, Instagram will compress the width to 1080p on its own, which will result in better quality than if we choose 1080p width on our own.
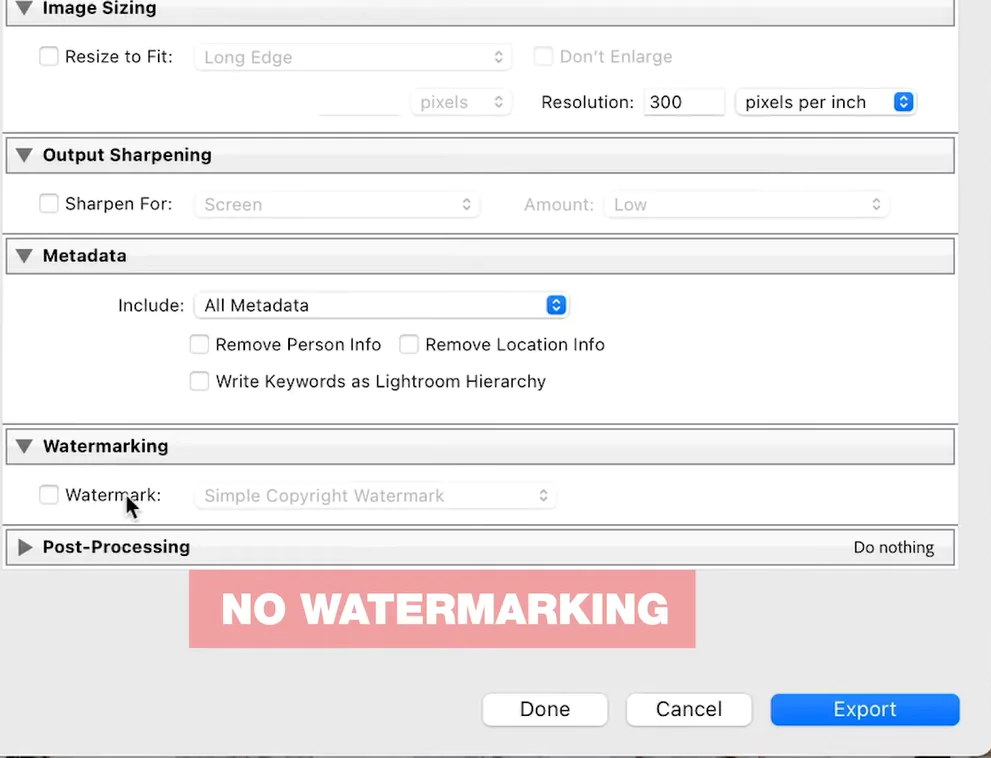
Lightroom Export Settings for High-Resolution Print
- Location: Designate your chosen output location.
- File Naming: Opt for “Filename_Print” for clarity.
- File Settings: Select TIFF format, sRGB color space, and set quality to 100%.
- Image Sizing: Disable the resize option and maintain resolution at 300 PPI.
- Sharpening: Choose matte or glossy sharpening with standard settings.
- Metadata: Keep the default setting.
- Watermarking: Ensure the watermarking option is unchecked.
Lightroom Export Settings for a Website
- Location: Specify your desired destination.
- File Naming: Utilize “Filename_Website” for better organization.
- File Settings: Choose JPEG format, sRGB color space, and set quality to 85%.
- Image Sizing: width at 2048px and resolution at 72 PPI.
- Sharpening: Apply screen sharpening with standard settings.
- Metadata: Include all metadata, then ensure to remove personal and location info.
- Watermarking: Personalize as per your preference.
With the help of these Lightroom export settings, you can easily prepare your photos for high-resolution prints, websites, and Instagram.
Accessing the Export Dialog in Adobe Lightroom:
- Select the image you want to export
- Hover your cursor over ‘File,’ and a dropdown menu will appear. Within this menu, you’ll find the ‘Export’ option. Click on it to proceed.
- Shortcut: If you prefer keyboard shortcuts for Lightroom, you can also access the Export dialog by using the following keyboard shortcut:
- For Windows: Press Ctrl + Shift + E
- For Mac: Press Cmd + Shift + E
File Settings According to Your Requirements
Choosing The Right File Format:
When exporting photographs from Lightroom, choosing the right file format is crucial. Here are several important file formats to take into account, along with their typical applications and platform compatibility:
- JPEG (Joint Photographic Experts Group):
- Use: Ideal for online sharing, social media, and general digital use.
- Characteristics: Compressed, smaller file size, suitable for viewing on screens.
- Compatibility: Compatible with virtually all devices and platforms, including web browsers, social media platforms (Facebook, Instagram, Twitter), and email clients.
- TIFF (Tagged Image File Format):
- Use: Best for high-quality printing and professional applications.
- Characteristics: Lossless, retains maximum image quality, larger file size.
- Compatibility: Widely supported by professional image editing software (Adobe Photoshop, CorelDRAW), high-end printers, and publishing platforms.
- DNG (Digital Negative):
- Use: Suitable for archiving and future editing, especially within the Adobe ecosystem.
- Characteristics: Raw format, retains editing flexibility and metadata.
- Compatibility: Widely supported by Adobe software (Lightroom, Photoshop), some other image editing software, and archival systems for long-term preservation.
Choose JPEG for web sharing on multiple platforms, TIFF for professional printing and software, and DNG for Adobe-centric workflows and long-term archiving. When selecting a format, take into account your intended use, desired image quality, and the platforms where you plan to share or work with your images.
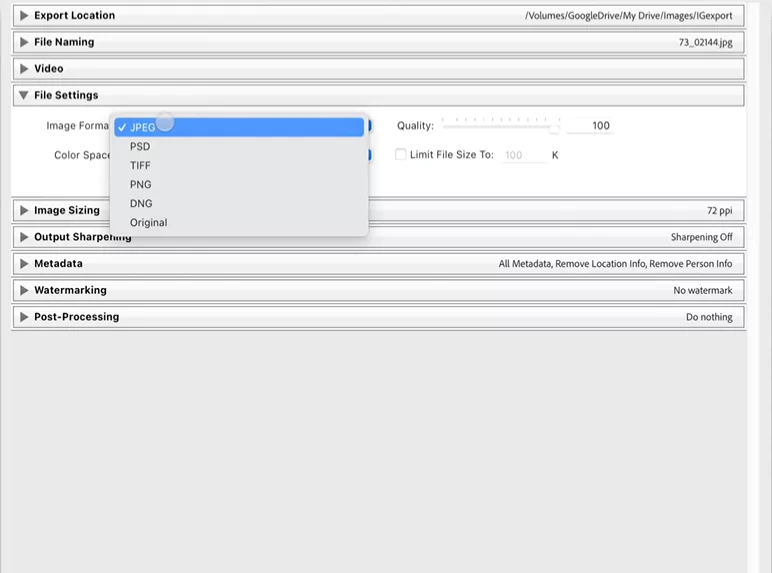
Image Quality Settings:
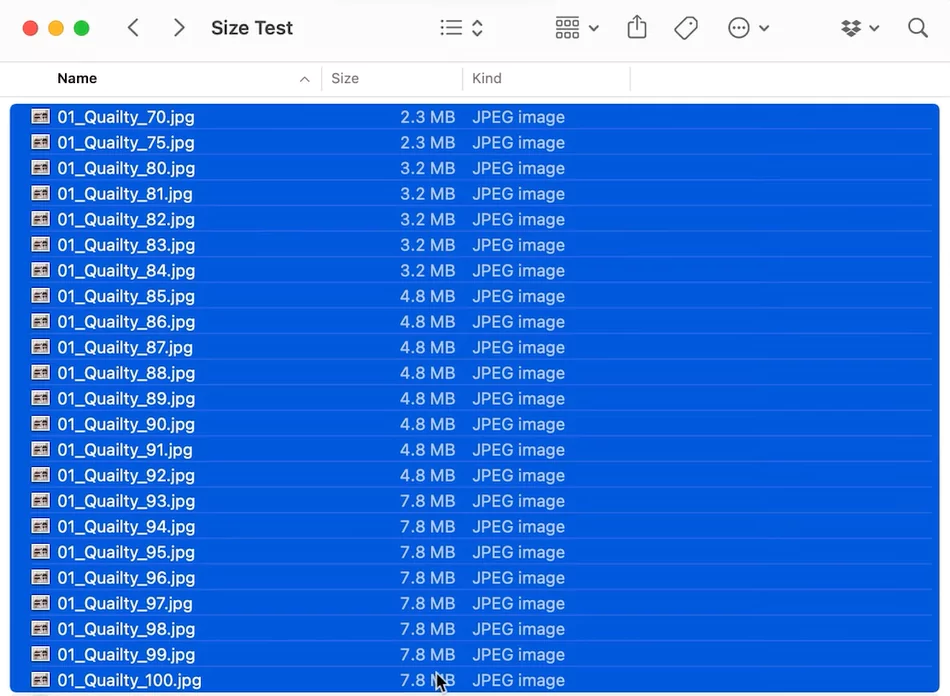
When exporting photographs as JPEG files, you can adjust the compression level using this option. Lower values (like 80–90) result in smaller file sizes with some loss of image detail, while higher values (like 95–100) result in greater image quality but larger file sizes.
- For Instagram: Use a quality setting of 80-85 for JPEGs. This balance between file size and quality works well for internet sharing and social networking platforms.
- For Print: Use higher quality settings (like 100%) when printing your images to get excellent detail and image quality on physical copies.
Tip: According to my research, if disk space is an issue, bear in mind the numbers 92 and 84 because the file size stays the same between 93 and 100 and then decreases when you go from 93 to 92. The same is true for the 84; when you go from 85 to 84, the file size decreases but stays the same for 85-92.
Here are the size constraints for some prominent platforms; if a platform has size limitations, check the “Limit File Size To” box and enter the appropriate maximum file size for the platform you wish to use:
- Instagram: Max 30 MB
- Facebook: Under 15 MB is recommended
- Twitter: Under 5 MB is recommended
- Flickr: Up to 200 MB
- Pinterest: Max 20 MB
- Website hosts (e.g., Wix) vary, but Wix recommends no larger than 25 MB.
Color Space Settings:
For most general uses, especially when sharing photos digitally on websites or on platforms like Instagram, the sRGB color space is a great option; it is the web standard and guarantees bright, consistent colors on a variety of screens and devices. The ideal color space setting for export largely depends on your intended use.
Nevertheless, the choice of color space should be in line with your particular project goals, whether for digital sharing or physical prints. If, on the other hand, you are getting ready for professional printing or need a wider color gamut for advanced editing, the Adobe RGB color space might be more appropriate. Adobe RGB encompasses a broader spectrum of colors, making it preferred for high-quality prints, especially when working with professional printers.
Image Sizing Optimization
To change the size of the image, I advise you to select width and height as the parameters.
For social media platforms:
- Instagram:
- Image Posts: 1080px (bottom edge).
- Landscape: 1080 x 608px.
- Portrait: 1080 x 1350px (4:5 aspect ratio).
- Facebook:
- Image Posts: 1200px (bottom edge).
- Portrait: 1200 x 1500 pixels (4:5 aspect ratio).
- Twitter:
- Image Posts: 1200 x 675px (16:9 panoramas).
- Flickr Pro:
- Pro Accounts: 6144px (long edge).
- Other Accounts: 2048px.
- Pinterest:
- Image Posts: 1000px (short side).
- Landscape: 1000 x 1500 pixels.
- Portrait: 1000 x 2100 px.
- Website hosts (e.g., Wix):
- It suggests 2560 x 1440px images.
For Print: Make sure the image proportions match the size you plan to print it on. If you are not sure, ask the print provider you have selected what their recommended print size is.
The best resolution displays at 72 ppi for online viewing and 300 ppi for printing, so make sure to tick the “do not enlarge” box.
Output Sharpening
- Sharpen for: Select your desired output (which may be “Screen” for online sharing or the particular print format you are aiming for) from the drop-down menu located in this section.
- Amount: To regulate the sharpening intensity, move the “Amount” slider; a greater number yields a more noticeable sharpness.
My recommendation is to choose Sharpen for Screen and Standard Amount during Lightroom Export. Since we have already completed the necessary sharpening during editing, we do not need to bother about it at this time.
Other Lightroom Export Settings
File Naming:
Use meaningful file names when exporting your images to keep your library well-organized. You may also use keywords, dates, or project titles to make your images easier to find later. By using consistent naming standards, you can increase image searchability and streamline your process.
Watermarking:
Watermarks are a great way to safeguard your work and build your brand. Make sure to place them thoughtfully so they do not overpower your photographs, and adjust their opacity to balance security with image visibility.
Metadata
Utilize Lightroom’s metadata presets to automate the process of creating and applying metadata for your exported photos. This will improve accessibility, searchability, and adherence to the terms of the license for your work. Include copyright information, keywords, and descriptions in your exported photos.
You do not have to worry about metadata or other things for Instagram. You may choose to use or not use a watermark for regular social media postings.
Transferring Photos To Phone
After exporting from Adobe Lightroom, we typically move our photos from the Lightroom PC to our mobile phone for social network uploads (Instagram). Nevertheless, a lot of apps compress and lower the quality of the images.
Tip: Steer clear of many processes and refrain from moving your photo back and forth between apps.
- For iPhone and Mac users, use Airdrop.
- For Windows and Android users, use Google Drive or Dropbox.
Best Lightroom Mobile Settings
Save your export settings as a preset so you do not have to waste time every time you want to export photos with the same settings. Lightroom Mobile shares exactly the same settings as Lightroom PC. Image sizing, File settings, resolution, and quality are all available on Mobile, and you can follow the same guidelines as I previously discussed.
Conclusion: Best Lightroom Export Settings
Finally, by going through this blog post’s extensive guide, you have learned a lot about the best Lightroom export settings for a variety of uses, from web sharing to high-quality prints, and how to maximize them. This will help to ensure that your images look their best whether shared or printed.
Knowing how to use Adobe Lightroom’s export settings will guarantee that your photos maintain the quality you intended and enable quick and easy sharing across various media. Whether you are a pro photographer or just a hobbyist trying to show off your work, these export options are essential for presenting your photos in the best possible way.
Lightroom’s flexible export options let you customize settings to meet specific requirements, so your images look great on any platform. As you incorporate these export settings into your workflow, keep in mind the importance of balancing file size and image quality based on your intended use.
Enjoy the creative possibilities within Adobe Lightroom, and watch as your exported images captivate audiences with their clarity and visual appeal! Stay tuned for more insightful tips and tutorials to further improve your Adobe Lightroom skills! The journey of optimizing export settings is ongoing, and with each new project, you will find opportunities to refine your techniques and present your photographs in the best possible light!