There are several ways to batch and bulk edit in Lightroom. Batch editing is a technique used in photo and video editing where you apply the same adjustments or style to a group of photos or videos at the same time, saving time and guaranteeing a consistent look across your collection. It is like editing multiple files at once, making your work more efficient.
When working on your images and videos in Lightroom CC, Lightroom Mobile, and Lightroom Classic in 2024, batch editing is a very helpful and time-saving technique. In this guide, we will hold your hand and walk you through the basic yet powerful art of batch editing in Adobe Lightroom. So let us get started on this exciting journey!
Method 1: Copy And Paste Edits From One Photo To Another
This is my favorite method for batch editing in Lightroom; it is basically the same copy-paste mechanism we use for everyday tasks, but it works best and is highly recommended when we want to apply all the desired adjustments to one photo and then apply those same adjustments to another batch of photos. Here are the easy steps to follow:
Step 1: Select a picture containing the adjustments you wish to duplicate. You can use the Lightroom keyboard shortcut Command+C (Macintosh) or Ctrl+C (Windows) to duplicate all of the edit settings.
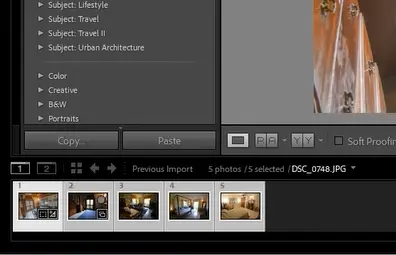
Step 2: To copy individual edit settings rather than the entire set of adjustments, for example, you might want to copy the exposure adjustments without copying the color adjustments. To accomplish this, press Command+Shift+C (Macintosh) or Ctrl+Shift+C (Windows), which will launch a dialog box where you can choose which edit types to copy. You can also use the Select menu to pick from various change categories, such as All, Modified, Default, or None.
Step 3: To apply the edit settings to all the selected images, click on them while holding down Command (Macintosh) or Control (Windows). Then, use Command+V (Macintosh) or Ctrl+V (Windows) to paste the edits onto all the selected images. This method makes it simple to quickly and easily apply the same adjustments to a batch of photos.
Quick Tip: Another fast way to copy and paste is to edit one image at a time, rather than batch editing multiple images at once. To apply the same editing settings to the next image after selecting the previous one, simply click the “previous” button in the lower right corner of the screen.
Method 2: Apply Presets During the Import
To streamline your editing workflow, use batch editing with presets during import when you have a collection of images or videos from the same production or event that should have a consistent style or mood.
Step 1: Open the Import Dialog. To open the import window and choose which photographs to import, click the “Import” button.
Step 2: Find the “Apply During Import” Panel: Usually located on the right side of the screen, the “Apply During Import” panel can be found in the import dialogue.
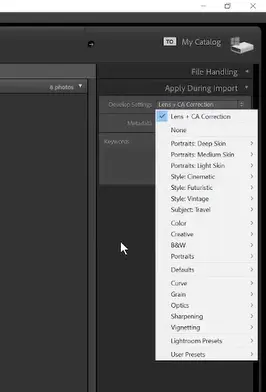
Step 3: Select a Preset: Select the dropdown menu next to the “Develop Settings” or a comparable item in the “Apply During Import” panel.
Step 4: Select a Preset: From the drop-down menu, select the preset you want to apply automatically to all the images you’re importing.
Step 5: Finish the Import Process: After selecting the preset, carry out the import procedure as you usually would. Lightroom will now apply the preset you have chosen to every image as it imports.
By doing these steps, you can make sure that all of the images you import into Lightroom have the preset settings applied automatically, which will save you time and provide a unified look throughout your collection of images.
Quick Tip: To keep your imported photographs looking the same, make sure the preset you choose matches your intended style before turning on the automatic preset application during import.
Method 3: Apply Presets In The Library Module
If, on the other hand, you would like not to apply preset settings during import, you can apply preset after the images are imported. This is the same process as importing a preset in Lightroom, with the additional requirement that you choose which batch of photos to apply the preset to.
Step 1: Launch Lightroom, then select the Library module.
Step 2: Use the Shift key to pick multiple photos that you want to alter in the same style.
Step 3: Ctrl+Click: To choose each photo, click on it while holding down the Windows Ctrl key.
Step 4: Shift+Click: This method selects all images in between by clicking on the first image, holding down the “Shift” key, and then clicking on the last image.
Step 5: Locate the “Quick Develop” panel on the right side of the library module.
- Click on the “Saved Preset” dropdown (use the Tab key to navigate if needed).
- Choose the preset that suits your style from the drop-down menu (use arrow keys to navigate).
- Your selected photos will now have the same style, making your editing process quick and easy.
Method 4: Batch Edit With The Synchronization Option
Compared to applying adjustments to each photo individually, Lightroom Classic’s synchronization provides a more thorough and accurate method for performing batch modifications, guaranteeing efficiency and consistency.
Step 1: Select the “Develop” module from the panel in the upper right corner.
Step 2: Edit the First Image: Start by editing the first image in your batch. Adjust exposure, contrast, or any other settings that need to be changed. Keep in mind that this synchronization method operates by applying changes to the first photo to the other photos. Therefore, take great care when editing the first image.
Step 3: Choose the images you wish to make these modifications to from the filmstrip or grid view at the bottom. You can choose more than one image by holding down the Ctrl (Windows) or Command (Mac) keys.
Step 4: Locate the “Sync” button in the Develop module; it is usually situated at the lower-right corner of your screen.
Step 5: Check the boxes next to the changes you made to the first image to select which particular settings you wish to sync. A dialog box will then appear.
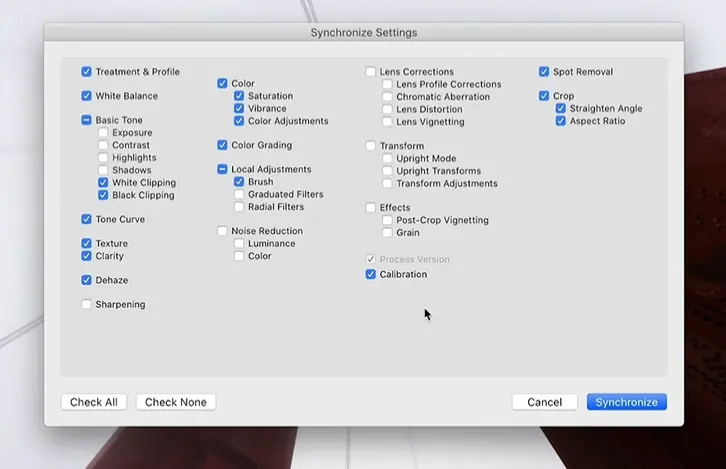
Step 6: To apply the desired settings to the selected photographs, click the “Synchronize” button, and Lightroom Classic will swiftly sync the modifications throughout the whole batch.
Quick Tip:
- If you wish to make adjustments to a single photo, you can use the “Reset” button in the Develop module to undo any accidental modifications and start again if necessary. The synchronization option applies changes to all the photos you selected.
- Because synchronization makes alterations to all selected photographs, use caution when using it. Ensure that the first image’s edits are accurate before syncing. You can also make changes to the reference photo.

Method 5: Use ‘Auto Sync’ To Automatically Synchronize Edit
While synchronization is a very useful tool, its main drawback is that it only applies changes that have already been made. If, after synchronization, you find that something needs to be changed, you cannot apply this change to the entire batch when batch editing; you can only make changes to the first picture and then apply the changes to the entire batch of photos. In these situations, auto-synchronization is very helpful and convenient.
Similar to the real-time technique, auto-synchronization allows you to make changes to any image and they will be automatically applied to the remaining photos in the batch. The easy steps to use this auto-synchronization approach are as follows:
Step 1: Open Lightroom Classic’s Develop Module, then use the keyboard shortcuts Ctrl (for Windows) or Command (for Mac) to choose the images you want to edit in parallel.
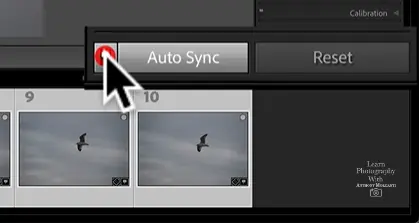
Step 2: Activate the “Auto Sync” feature by clicking on the “Sync” button or “Auto Sync” toggle at the bottom of the Develop module. This feature may not always be visible unless you activate it. Occasionally, the “Auto Sync” option is hidden by default.
Step 3: Make the desired improvements to the first image in your selection; these changes will now be applied in real time to all selected images. Check and tweak the synchronized edits on individual photos as needed.
Mistakes to avoid:
- Make sure your initial alterations are accurate before using “Auto Sync,” as any changes you make to the first image will instantly apply to all chosen photos.
- Make sure you pick every picture you wish to synchronize; if you don’t, some of the photographs will not have their synchronized modifications applied to them.
Method 6: Batch Edit With Metadata
The information that your camera automatically records when it takes a picture is called metadata. Lightroom can be used to edit metadata for multiple photos, which will help you manage and organize your collection of images. Examples of metadata include the date and time of capture, lens and color settings, and more.
Step 1: Select the group of photos you want to edit based on specific metadata attributes like the capture date or camera model.
Step 2: To make changes to metadata, such as keywords, captions, or copyright information, navigate to the Library module’s Metadata panel. From there, navigate to the “Apply During Import” box on the right, and click the “New” option under the Metadata bar to bring up a comprehensive box with a variety of metadata options.
Step 3: Once you’ve made the necessary changes, use the “Sync Metadata” option to apply these changes to all the selected photos. It’s essential to review and confirm that the changes are accurate and have been applied consistently across all the selected photos.
Batch editing with metadata makes it easier to manage and organize your photo collection by facilitating the search and categorization of your collection based on particular details.
How to batch edit in Lightroom Mobile?
Compared to Lightroom CC on desktop and Lightroom Classic, Adobe Lightroom Mobile has a different edit workflow. On the other hand, Lightroom mod apk for mobile is more user-friendly than Lightroom Classic.
- Tap the “+” or “Add Photos” icon to import the desired photos.
- To enter the editing panel for the first photo, tap the selected photo in the library or grid view, then select the “Edit” option.
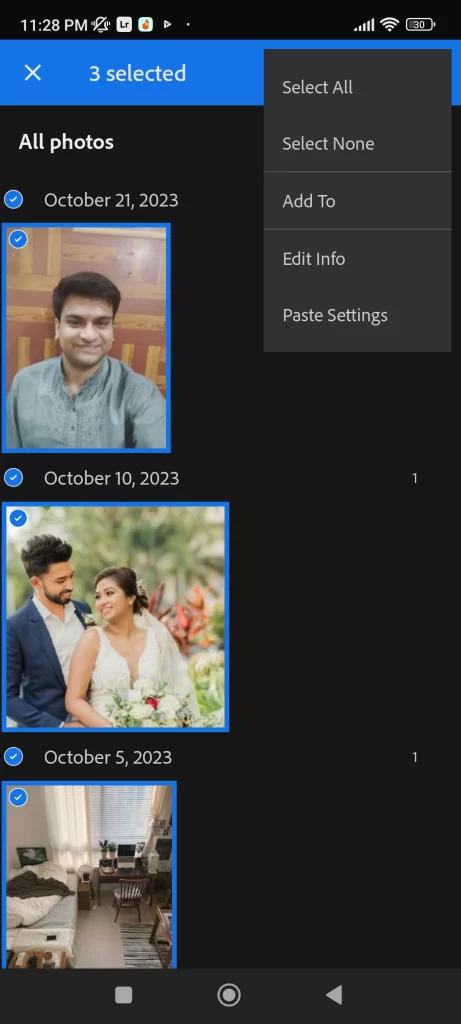
- While in the editing panel, find the “Copy” icon and tap it to duplicate the adjustments made to the first photo.
- To apply the same modifications to the full selection, go back to the library or grid view, pick the other photographs you want to change, and then hit the “Paste” icon.
- Tapping on each altered photo and utilizing the editing tools will allow you to review the results and make any necessary fine-tuning modifications.
- After you are happy with the changes, select “Save” or “Export” in Lightroom Mobile to save the collection of images.
Additionally, you can apply editing settings in batch editing on mobile devices by using Lightroom presets.
Conclusion: How to Batch Edit in Lightroom
Finally, photographers looking to improve efficiency and consistency in their post-processing workflow will find that learning how to batch edit in Adobe Lightroom is a game-changer. By following the thorough tutorial offered in this blog post, you have gained invaluable insight into the tools and strategies Lightroom offers to automate and streamline the editing process for multiple images.
Understanding how to batch edit in Adobe Lightroom empowers photographers to save time, maintain a cohesive look across their photo collections, and enhance productivity. The synchronization of adjustments, the creation of presets, and the utilization of the powerful Develop module offer a versatile solution for achieving consistent and professional edits with just a few clicks.
Remember to go over each image one at a time to make sure that particular details and characteristics are taken into account as you integrate batch editing into your workflow. Lightroom’s flexibility strikes a balance between efficiency and customization to help you optimize your editing process.
Watch this space for more insightful tutorials and tips to improve your Adobe Lightroom skills. The path to batch editing mastery is never-ending, and every project presents new opportunities to hone your skills and create aesthetically beautiful, consistently edited photo collections. Explore the creative potential of Adobe Lightroom, and witness as your editing productivity and quality soar!